Road to Hana

Back to Maui

Back to Hawaii

Through winding roads and picturesque sites, the 50 odd mile stretch between Paia and Hana showcases the diverse beauty of the Maui coastline and is an ode to the tropical rainforest the island hosts. While the western part of the island of Maui is arid and barren, the eastern part, dominated by the colossal Haleakala, receives a huge amount of rainfall being in the other side of a rain shadow. The stretch between Paia and Hana has some of the spectacular coast views, numerous waterfalls, challenging bends, narrow bridges, and to top it all, a misty rainforest. On the drive you will go in and out of the dry and wet zones and likely will encounter some random landslides and repair work.

Even though the drive is challenging, it is best to drive instead of taking a tour bus solely

hana2

Beauty and the Beast

because of the flexibility it offers. We trusted our tour guide app (see below) and the muscle of the rental roadster to push through the mists and fog in the rain forest, we stopped many times, even more than the stops our personal tour guide (check out the driving trip guide details) suggested. Travel sites dedicated to this scenic highway (e.g. Roadtohana) has a detailed list of places to stop, explore and take pictures along the way to Hana. Here are a few that cannot be missed:

  • Town of Paia – Take a stroll and have breakfast in this quaint little town. Fill up on gas and take restroom breaks here as these two are hard to come by in the upcoming stretch to Hana. After leaving the city of Paia, there is a Kuau store right before entering the main stretch of Hwy 36, to pick up coffee and sandwiches/snacks to-go.
  • Ho’okipa Lookout (Mile #9) – Along the road to Hana, you will see the coast a hundred times,
    hana8

    Ho’okipa Lookout

    but this is the best place to catch an expansive view with windsurfers and kitesurfers scoping the massive waves.

  • Kaumahina Park – Boasts a dramatic view of the northeastern coast with steep cliffs and the forest plunging in a hurry to kiss the surf.
  • Ke’anae Arboretum – There is a paid attraction called Garden of Eden at Mile #10, but we suggest you avoid that and instead spend some time in the Ke’anae Arboretum. Park anywhere hana6along the street and cross the road carefully to enter. There are no clear signs but the entrance is to the right side of the road (while traveling to Hana). Explore some of the Flora and Fauna of the rainforest here.
  • Halfway to Hana – Be sure to stop here at any of the stores and park carefully. Spend 15-20 minutes to taste the fresh baked banana bread and beverages. Probably the best banana bread in the islands, so don’t miss it. Oh, and fresh fruits too. Have some fresh pineapples and green coconut if you can find them.
  • Upper Waikani Falls and Hanawai Falls – Among all the waterfalls that can be seen hana1along the route in the side of a little bridge, these two are our favorites. Parking can be difficult, but be patient. Most people will not spend more than 15 minutes at these sites. Park safely and enjoy! The main waterfalls are in the right but don’t forget to look to the left since heavy rainfall sometimes makes the trailing edge of the waterfall more beautiful than the main one.
  • Nahiku Marketplace – Fun spot to pick up some gifts (but bargain first), and have a meal. Try the kahlua pork tacos.
  • Wai’anapanapa State Park (Mile #32) – Gorgeous views of the rocky cliffs, black sand
    waianapanapa-park-beach

    Black sand beach

    beach, freshwater caves and history await as you meander through the pebbly trail. Be sure to pack your swimsuit to take a dip in the ocean or at least to soak your feet here. Black sand beaches with low surf are not that easy to come by, afterall.

  • Hana – A quaint little sleepy town on the water, Hana, has probably not changed over the centuries. Home to historic battle sites, places of worship, and surrounded by legends, this town requires you to spend at least an hour to gather the pointers for your storyteller self.
  • Kipahulu (Mile #42) – It is a part of the Haleakala Nat’l park and you can reuse your ticket for 7 days. This portion of the park is in the rainshadow area and therefore does not get that much rain. Spend an hour or so in the trails to explore the seven sacred pools and the Waimoku falls.


Flora, Fauna and the Environment

  • Rainforest – Hawaiian islands have the only tropical rainforest in the US. The rainforest in Maui is created due to the enormous Haleakala volcano standing tall blocking the strong trade winds coming in with the moisture from the Pacific. The Haleakala National Park is itself divided into the rain shadow and the rainforest zones and visitors can explore both sides in their trip to the park. The eastern side is the rain shadow.

    hana7

    Rainbow Eucalyptus

  • Rainbow Eucalyptus birch –  Commonly found in the rainforest along the way to Hana, this tree has multi-colored streaks on its trunk. It is native to Philipines and was introduced to Hawai’i in the 18th century. Due to the sturdiness and fast growth patterns, it was commonly used for construction purposes.


Essential Travel Tips

  • Food/Beverages – We were a little misguided by Tripadvisor stories on the lack of food options along the highway, and packed lunch from the Kuau store in Paia. Although you can pack some light snacks in Paia, there are a lot of local restaurants and a couple of marketplaces around the middle of the highway. The joints might not have a wide range of options, but trust us, the food and snacks are delectable.
  • Gas – Be sure to fill up the tank in Paia. There are no gas stations until you reach Hana.
  • Restrooms are available in the scenic spots, but are scanty. So prepare accordingly.

Hawaii Volcanoes National Park

Back to Hawaii

Back to Big Island

One of the UNESCO World Heritage Sites, covering over 500 sq. miles of land covered with rock formations and fresh lava flow, Hawaii Volcanoes National Park is a heaven for Geologists. The Mauna Loa and Kilauea volcanoes are the two shining stars in this park that is criss-crossed with trails and paved roads. After entering the park, follow an offline map, or use one of the Driving Tour Smartphone Apps (e.g. Shaka Guide).

For the list of places to cover, refer to Tripadvisor or any public sites including the NPS portal (Click here for a detailed offline printable map).

We thought sharing a little bit of knowledge about Volcanoes and the park might be helpful in your next visit to the park in relating to the concepts much easily. If you are interested in learning about Volcanoes and the formation of Earth, read on.

Written by our resident Geologist co-author, Rupsa

Hawaii Volcanoes: The history and science behind it

All the Hawaiian Islands and Emperor seamount chains are part of a mantle plume system. Mantle plumes or hotspots are nothing but molten rocks (lava) that rise from deep in the earth (mostly mantle) and reaches the surface of the earth through a weak zone (could be some deep fractures). The other common examples of islands created by hotspots are Iceland, Galapagos, etc.

Mantle plumes are stationary and can erupt through hundreds of years to millions of years before going extinct. Hawaiian plume has been erupting for millions of years creating Emperor Seamount chains, followed by Kauai which is the oldest island in Hawaii. As the Pacific plate moved over the plume, it went on to create Oahu, Maui, and the rest of the Hawaiian Islands before creating the Big Island. The hotspot is under Big Island currently. As the rate of plate motion has slowed down over the years, the same part of the plate is over the hotspot for a longer period, creating the largest island in Hawaii.

There are three types of lava flow structures that are most abundant in volcanic islands like Hawaii.

  • Pillow lavas: Pillow lavas are volumetrically the most abundant type commonly found in the underwater seamounts.
  • Pahoehoe lava: If lava cools slowly and does not move too fast it forms smooth ropy lava called pahoehoe. This type of flow forms some of the common features on the surface. Pahoehoe lava is characterized by a smooth, billowy, or ropy surface.Pahoehoe flows tend to be relatively thin, from a few inches to a few feet thick.
  • A’a lava:If lava cools quickly and moves fast it can tear into pieces called A’a.  A’a flow is characterized by a rough, jagged, spinose, and generally crackly surface. A’a lava flows tend to be relatively thick compared to pahoehoe flows. A’a flows, while rocky and sharp on the top, are extremely dense underneath – producing some of the most difficult rocks to cut through. Several hikes in the National Park take you past huge boulders of dense solid A’a. It is easy to compare with Pahoehoe that tends to be in layers.

Pele’s hair and Pele’s tear: Named after the Hawaiian goddess of fire, Pele, these structures form during times of high fire-fountaining. Pele’s hair are thin filaments of stretched out basaltic glass. Pele’s tears or Achneliths are tiny droplets of lava that look like tear-drops.

sulphur-springs

Sulphur Springs abundant with Pele’s hair and tears

Researchers have found that these are formed by the same overall process from the lava fountains, depending on the velocity of the erupting lava. High velocity and strong winds favor formation of Pele’s hair. Sometimes Pele’s tears are found attached at the tips of Pele’s hairs.

Big island has multiple volcanoes both active and dormant. Three major ones are –

  1. Mauna Kea – Dormant Cinder Top Volcano, 4,205m tall. Has a steep and irregular topography compared to other similar volcanoes in the area.
  2. Mauna Loa – Another cinder top volcano at 4,170m tall, it is younger than Mauna Kea, and erupts every few years.  A series of earthquakes beneath Mauna Kea may signal that an eruption could occur within a short time, although it cannot predict the magnitude of eruption.
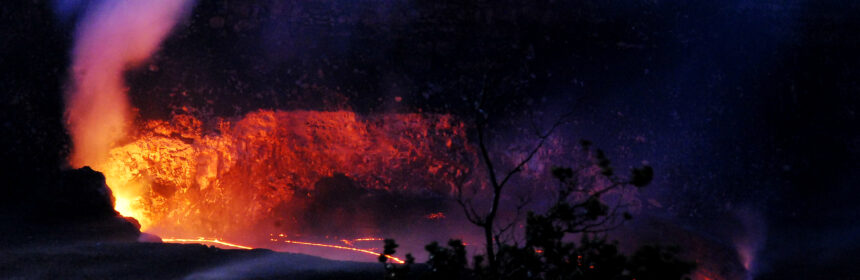
  3. Kilauea – In the last few years, Kilauea volcano is active and erupting continuously. Before going to Hawaii, do check the current lava flow status here. The recent eruptions are from the Halema’uma’u Crater at its summit and from the Puʻu ʻŌʻō vent in towards the east. Lava flow from Puʻu ʻŌʻō is relatively recent (30 years old) and continues to enter the ocean at Kamokuna. Although surface flows have been common in this eruption, most of the lava from the vent travels concealed in lava
    kulaeau-crater

    Kilauea Crater from Jagger Museum (shot around 5am)

    tubes until it reaches the ocean. A blowout during a 2008 eruption built a lava lake in Halema’uma’u crater, which is a remnant of a past explosion. The lava is in this crater is as light as water. The base level of the crater is unstable to the point that it rises and falls by the minute. The gaping hole through which the eruption is visible, is a direct conduit into Kilauea’s magma reserves. This crater is just a gentle reminder how active and dynamic our mother Earth really is.

The experience of witnessing rock in its bright molten state and watching new land being formed is quite a fascinating experience, if you are lucky enough to witness it. When hot lava enters the water, it bursts into pieces, building new land at the ocean edge from the fragmental material. This pile of rubble is then covered with a veneer of lava flows, forming a “bench”. Initially the bench is weak enough that it can collapse with the smallest disturbance around it. After multiple layers of such deposits and cooling of magma, typically taking several hundred years, once the bench is stable and large enough, a new island is created. After hundreds of years of depositions of lava followed by some tectonic activity (earthquake mostly) those submerged islands rose above the water and resulted in the islands the way we see them in the present. In a nutshell, that is a brief history of the Hawaiian Islands. There are multiple islands like these that are currently submerged under the ocean in the area, and in a few hundred years we will be able to see another island full of volcanic activity, south of the Big Island.

Tips Before Visiting the Park

Although there are clearly marked barriers and signs at sites, there are some common sense warnings that one MUST follow. Read on to find out the science and geology behind those hazards and why it is important to follow them for your own safety.

  • What are the Volcanic Hazards Facing you?
    • Bench collapse can cause a 100-200 feet steep drop into unknown craters
    • Rock jets & littoral fountains hurl hot lava that erratically gets sprayed
    • Steam blasts toss rocks
    • Acid fumes (Sulphur di oxide, carbon monoxide) and glass particles can irritate eyes and lungs causing suffocation and choking
    • Scalding waves burn where lava meets ocean
  • Recommendations:
    • Do not stand near the steep cliffs. This land is extremely weak and breaks off frequently; it is impossible to climb up from the crater or ocean vertically.
    • Do not go on the rocks close to a volcanic eruption. Bench collapses have killed people.
    • Do not go near the water as it can be boiling hot and likely contains sulphur fumes.
    • Move inland quickly if you hear unusual noises.
    • Please be prepared for personal hazards especially when hiking through the enormous lava fields:
      • Most injuries are not directly due to the eruption. Intense sunlight and high temperatures can lead to dehydration, heat exhaustion, or sunstroke. Air temperatures near lava flows can exceed 120°F (49°C), depending on cloud cover and wind conditions.
      • At higher elevations, wind and rain can lead to hypothermia (low body temperature). Carry sunscreen and a hat, and drink more water than you think you need.
      • Injuries from a fall are common. It is easy to break through a thin, overhanging crust of lava or trip on a crack and fall on the abrasive, glassy surface. U.S. Geological Survey (USGS) scientists always wear long pants, sturdy boots, and sometimes gloves when working near the flows. Never shorts and flip-flops!
      • Before visiting the lava field, check with Park Rangers for current conditions and for the best approach route. Park Rangers do not recommend that you attempt the hike to the coast if you are unprepared or uninformed. The area is remote, has no shade or water source, and is seldom patrolled. Also, most areas in the park has no cellphone reception.

If you are interested to find out more about Hawaiian Volcanoes there are plethora of information in the internet. Some of the sites that I personally like are:

  • USGS website in general. Their live webcam of Kilauea is quite fascinating.
  • Universities often organize field trips to the Hawaiian Volcanoes and their reports are usually easy to follow and contains lots of authentic interesting information. One of such link is here

Because of their altitude, the summits are covered in snow in winter and are usually cold and windy in the rest of the year. So, if you plan to go for star gazing, sunset viewing at the summit, or hiking up to the visitors’ center (beyond which tourists are not allowed to drive on their own) please be prepared with warm clothes unless you are used to the Polar weather!! If you go for star gazing and sunset viewing (highly recommended) with a tour company (read our experience), they usually provide parkas. However, if you are like me to whom anything below 55˚F (10˚C) is freezing please carry a pair of gloves, and wear long pants (preferably wind buster), and close toed comfort shoes are also highly recommended.

Mauna Kea Summit

Back to Hawaii

Back to Big Island

Mauna Kea is a dormant volcano in the center of the Big Island, and is about 14000 feet high. Due to the easy access to the summit, taking about 2 hours from sea level, several observatories are set up at the top. It also attracts scientists and astronomy enthusiasts from around the world.

But before venturing into the wild, precautions are necessary to drive up to the summit –

  1. Altitude sickness can sneak in any time because of quickly changing altitude and thinning oxygen content of the air.
  2. Only 4 wheel drive cars are allowed to travel beyond the Visitor Center (at 9000 feet).
  3. It can be extremely cold with heavy winds. So layers are important. Also staying hydrated and warm are key to enjoy the surreal beauty of the night sky.

We took the Mauna Kea summit adventures tour with stargazing (cost ~$450 for two). Although we hate conduced tours, especially the ones that deal with science and nature. With slightly above average knowledge about the geology and science of volcanoes, this tour seemed a little below par in providing intriguing information.

We were picked up from the Kailua-Kona market area around 2:45PM. The pickup spot was conveniently located, and the driver was on time. We took the longer route to reach the park visitor center to pick up other guests. En route, the driver did give out some information that was interesting but being jetlagged, we got into intermittent slumbers (so it was not that interesting after all. ;-)).

Once up to the top visitor center, we were given out Parkas and gloves. For the ones who bought the dinner, warm lasagna was served here as well in aluminum foils. We did not get the dinner option and instead carried sandwiches (which I’d strongly recommend since we heard the food was not palatable enough).

It gets really windy and starts getting low on oxygen. So it is normal to feel dizzy, and the best way to beat that is the breath slowly and walk/eat at a moderate pace. Staying warm is also important so take opportunity to grab coffee, hot chocolate or tea.

After spending ~45 minutes here, we hopped on to the bus and headed to the peak. The drive up was slow and adventurous. Once up there, just before the sunset, it got dark

quickly, wind picked up, and the cold was borderline unbearable. But having set up the tripod in time, I was able to grab some stunning sunset pictures.

Due the altitude, it was not advisable to stay up there for long. Therefore we headed down in the dark and could slowly see the stars above shining bright. We stopped near the visitor center and parked somewhere empty so that other cars’ headlights don’t spoil the mood.

There was a large telescope setup in the visitor center and there was a long queue for stargazing. Our private tour had two telescopes set up and we could take turns in seeing the Milkyway, Venus, Saturn, Proxima-Century and a supernova. The guides were patient enough to explain what we were seeing. There was hot chocolate/coffee and snacks as well for everyone to stay warm.

We started our descent around 9pm when the stars of interest started going below horizon. After an exhausting day of excursions, we were back to the hotel and ready to hit the couches by midnight.

In conclusion, we do want to state that it is one of the very few places in the world where regular visitors can climb that kind of an altitude, driving. The amount of stars you can see in the darkest of the nights is surreal. Walking in the summit would make you wonder if you are still on Earth or suddenly teleported to Mars or the Moon. Definitely a MUST do in Big Island.

Check out my TRIB review here.

Brief history of Hawaii

Back to Hawaii

Brief History of the Islands

Hidden in the myths and legends of the indigenous folk, is a bloody and war torn history that dates back hundreds of years. First sign of men coming to the islands was in the fifth century when Polynesians arrived accidentally in their canoes. In the early part of the second millennium, Tahitians arrived with their Gods and demi-Gods, and instituted social structures. Division of land, social divides, and early professions started under the rule of a Monarch. The Kingdoms and the casts were in constant conflicts, yet the culture flourished with art, sport, and food. Even though cultural aspects started booming, none could actually mature into a major cultural menhir probably because of the absence of external influence and presence of constant internal turmoil.

Hawaiian islands changed hands several times during the royal kingdom reign and stayed divided. In late 1700’s, king Kamehameha united the islands and unified the tribes. After Capt. James Cook discovered the islands, constant inflow of traders, seamen and whalers changed the face of the islands and it started becoming westernized. Colonists slowly started taking over and the local free men were put under dominance. In 20th century, agriculture flourished with plantations of sugarcane, coffee and pineapple. Founder of a now famous juice company, James Dole put a spotlight on the islands after he started a massive production of fresh fruits and juices.

Hawaiian islands became an American territory and US started using the port of Pearl Harbor as one of the mainstays of Pacific dominance. The islands were on the spotlights again after an unfortunate set of attacks by the Japanese in WWII. After the unfolding of the war and a changed political landscape, Hawaii became the 50th state of the United States in 1959. The ethnicity, culture, and diversity of the islands still carries the untold stories of the islands from a historical and political perspective.

So why does the Hawaiian flag have a Union Jack in it?

In late 1700’s, Great Britain presented the Union Jack to the King Kamehameha to unite the islands and offered help. From then on the monarchy and political landscape changed significantly. But even after its independence and being included in the United States, it retained the Union Jack as a portion of the state flag to corroborate the historical significance.

Mexico: Things to know before you go

Before you embark on your journey to any part of Mexico, please make sure to read the following for a survival guide in Mexico.
Visa Situation: If you are not a citizen of countries exempt from a Mexican tourist visa, please make sure to have your visa stamped in the passport. For an Indian living/working in the US with a valid US visa, you do not need a Mexican visa if you intend to stay for less than 60 days. Make sure you have more than 3 months of visa validity. This applies to B1, F1, H1, L1, J1, and other popular visa categories.
Language: Spanish is the main language in many areas, but English is well understood in most places. In Quintana Roo (especially Cancun area), due to the large number of US visitors, English is spoken and understood relatively well. In Mexico City and other rural areas, however, you will find it easier to navigate and taste the local culture better if you have at least some level of comfort with Spanish. Definitely use Google Translate app on your smartphone if needed.
 Currency: As of early 2016, Mexico has stopped accepting USD bills as a currency for transactions. Before this, most parts of the country would happily accept USD albeit at a higher conversion rate (often arbitrary). International credit cards are widely accepted though. We always order foreign currency beforehand from our bank (Bank of America), and found that is by far the most efficient way of reducing hassle. Many banks (e.g. Banco Santander) have affiliation with US banks and may waive the ATM fee, but we have seen banks charge a foreign transaction fee of ~$5 per transaction if you withdraw cash from ATMs outside US. Mexican Pesos to USD conversion rates vary widely too, and we have seen it go from 9.5 to 20 within 2 years (2014-16). Also try to avoid airport currency exchanges as they offer extremely low rates.
 Local Guides: Offline apps with travel guides and maps are useful in foreign lands since data roaming is expensive. We have had great experiences with an iPhone app called Mexico City Travel Guide with Offline Street and Metro Maps by eTips.
 Getting Around: We always prefer to rent cars because of the flexibility and impulsive journeys we frequently partake. Driving in Mexico though has its drawbacks. Rental cars are cheap, but always try to stick to well known American brands like Hertz, Budget, Enterprise, etc. Always buy the liability insurance unless your credit card covers loss and damage protection. Try carrying a GPS device from the US with Mexico maps, as using your phone data will be expensive and unreliable. And, beware of the police as there is a ton of corruption and rental cars are easy prey since the license plates are marked in red making it easy to spot. Never leave anything visible in the car.
Driving: Driving in Mexico, especially in the cities can be difficult for a tourist, but if you have driven in any third world country, navigating here won’t be that cumbersome. Just need to remember a rule – do not expect anyone else to follow rules. 🙂 Also, in Mexico City, the police cars always seemed to have the blinking lights ON, so do not be alarmed if a cop car flashes light behind you. Keep driving following the rules you know. If they have to stop you, they will speak out in the loudspeakers.
– Costs: Last but not the least, expenses in your trip to Mexico in American standards will be pretty low. Plus with the strong USD, the total costs in your trip are likely going to be much lower than a domestic trip. Food is cheap, and in most places you will find decent local options. We love trying out local restaurants and bars everywhere we go, and have had a ton of fun finding local joints, street food, even food from roadside huts in Mexico. Yelp and Tripadvisor works well in most parts of the country making it easy to find options. In general, on a 5 day trip, average cost per day with travel, tickets to attractions, food, and sundry should not exceed $50 per person.

Peace Lodge, Heredia, Costa Rica

Back to Luxury Travel

Highlight of the Costa Rica Trip

Want to get away from the cacophony of the city and seek refuge in the serene rain forests, while also dipping in luxury? The Peace Lodge in the Waterfall Gardens, a mere 30 miles from central San Jose, Costa Rica gives you exactly this feeling. Catch some trouts for lunch, bathe in a waterfall, night crawl with colorful amphibians or soak in the mist of the rainforest while hummingbirds chirp away in your private balcony.

Let’s talk about the experience –
The staff were amazing. Jonathan gave us a quick run down of the property, and Oscar took us for a tour around the area to show what we can expect.
A mesmerizing sight once you step out of the reception. You can see the cloud forest and an 180 panorama of the gardens below from where you can hear, smell and see the nature.

The rooms were luxury redefined; with your last name in the door plate, canopied bed, a waterfall shower, huge balcony with a hummingbird feeder, a hammock, and an outdoor hot tub. We received a chic red wine bottle for our anniversary as well.

The park/gardens has several attractions which common tourists can come visit too.

1. The butterfly gardens – has the beautiful butterflies including the Morphos,
2. The Aviary with parrots, macaos, and the indigenous Toucans,
3. Trout lake – you can catch your own fish for lunch
4. Others like Orchid Garden, Snake garden, Frog garden etc.

Next morning we went to the cascading waterfalls including the La Paz Waterfalls. There will be tourists coming in from San Jose to the waterfalls, so take advantage of your room within the park and get there bright and early. Then go for a quiet breakfast buffet while watching different species of birds come in and greet you.

Food – All the restaurants inside are worth checking out. Have lunch at Trout lake, dinner at the Vista Poas, and breakfast at the outside seating area.

Although quite expensive, you should definitely try to stay here for a night, which is exactly what we did. We reached here from San Jose around 10am. La Paz Peace lodge picked us up from an Airport area hotel for ~$75 in a private shuttle.

Overall, this is luxury and nature combined in one sweet little property. Should be a must in a Costa Rica trip.

Room Tip: The hotel has only 17 rooms, so book really early. Also, spend at least 2 nights to get the most out of the experience.
Read other Tripadvisor Reviews here

Westin Lagunamar Resort, Cancun, Mexico

Back to Luxury Travel

Top notch resort for family, couple or honeymooners

This is my favorite Starwood property in N.A. First time we went in 2014, we booked with Starwood points, and we are glad that we booked this instead of the other Westin property south of the Zona Hotelera.
Amenities wise, this resort has it all; multiple on-site restaurants, fancy water activities, infinity pool, swim up bars, fantastic views from every room, and state of the art rooms.
You can spend an entire week just hanging out in the property. This resort also has a vacation rental program, so you will see a lot of people staying here for an extended period of time. With a little grocery store and ample parking, you can easily spend a week here without getting bored.
Right across the street is the shopping mall La Isla, where you can find an abundance of restaurants, shopping options, and attractions. This property is located almost in the middle of Zona Hotelera, therefore the downtown Cancun or the El Ray ruins are easily accessible either by bus or car. R1 and R2 bus stops are right in front of the hotel entrance.

Overall, if staying in Cancun, and an SPG loyal, choose this one over the other property down south. You won’t regret.

Hotel Tips:
– Room: All rooms have ocean view, but rooms in the main property have the views of the infinity pool alongside.
– Amenities: If traveling with a family, you can also do some groceries at the market place and cook your own meal. Sometimes it is fun to cookout and enjoy some local cerveza from the expansive balconies.
– Extras: There is a professional photographer onsite who can capture some fabulous photos while you dwell in the beach or the pools. They make memories of a lifetime.
– Also, if you choose to attend a presentation (90-120 minutes) about their vacation rental program, you get some travel credits (I think around $75) that can be used to book tours (like Chichen-Itza, XCaret, etc.) from the concierge.
Read all reviews in TripAdvisor here

Puebla and Cholula

                                                                                                                                        Back to Mexico

                                                                                                                   Back to Around Mexico City

The drive from Xochimilco/Mexico City is scenic with colorful houses up the hills, wide view of the Volcanoes, and clear blue skies up above. The new toll roads make the drive through the hills fairly easy. On our way to Puebla, we hit the Cholula ruins first in the afternoon, followed by a short trip to Puebla City.

Cholula

A city of Churches, Pyramids and Volcanoes, the area boasts a wide array of visual treats. The entry into the ruins cost about MXN $65 for non-Mexicans, and typically there is a line to enter. The entrance to the pyramids/ruins from the main road is through a tunnel that is part of a huge network of tunnels. ~10 kilometers of tunnels have been identified and restored for tourists’ use so far. The tunnel, although is marked well, is dimly lit, really narrow, and when crowded can be extremely claustrophobic.
Through the tunnels, you will be taken to the other side of the pyramids where a steep set of stairs will lead you up to the top of the pyramid to the Church. From the top of the Church, amazing views of the city with colorful houses and churches, and the volcanoes (if the sky is clear) can be cherished.

The other part of the ruins, the pyramids can be viewed from the bottom of the stairs, and also can be accessed easily. These pyramids were also built in four stages similar to the Templo Mayor in Mexico City. But these pyramids are not as grand as the ones in Teotihuacan, or Chichen-Itza (Mayan), but it’s cultural importance is astounding as it was at the helm of the civilization and was one of the most importance centers at that time.

Location Tips –
GPS Address: Av. 8 Norte #2, Centro, 72760 San Andrés Cholula, Pue., Mexico

Parking situation near the ruins area can be tricky. But there are public parking spots available at nominal charge (~MXN $25) in the by lanes parallel to the main street.

Puebla

After exploring the little city of Cholula, we ventured out to the much larger and more vibrant, Puebla. We headed straight to the Zocalo area, and parked in one of the public parking lots at MXN $14 per hour. The main street of Ave. Reforma, during the holidays, was swarming with tourists (mostly Mexicans) and was adorned with lighting fixtures everywhere. The festivities were apparent in each direction, and it grew as we walked closer to the main square of Zocalo. The historic center of the city is surrounded by hotels, restaurants and shops, along with historical sites. We visited the two most interesting ones –
a. Cathedral de Puebla – Embelished with artwork on metal, chandeliers and murals, this was another masterpiece of a church. During the holidays, thousands of visitors come in for casual viewing or prayers.
b. Palacio Municipal de Puebla – The grand structure right next to the park/square, is the main office of the city. A guide will escort a group of tourists upstairs and explaining the history of the palace along with the city in great detail. The guide only speaks Spanish so prepare yourselves.

For dinner, the little street side shops on Ave 2 Sur (between Calle 3 and Ave Reforma) are really good options. Tip – to be slightly away from the crowd, and away from the beggars, choose a seat near the restaurant walls. Most places here will also offer some live music by local artists.

Location Tips –
GPS Address: Juan de Palafox y Mendoza, Centro, 72000 Puebla, PUE, Mexico
Parking – Look out for sign “E” (short for Estacionemente/Parking) along the way to the Zocalo square along Ave Reforma (or any parallel street)

Museo Dolores Olmedo

                                                                                                                                        Back to Mexico

Back to Around Mexico City

Museo Dolores Olmedo, less than 20 minutes from the Embarcadero, hosts the biggest collection of works by Diego Rivera and Frida Kahlo. It is a free museum, with optional donations. Most of the year, there are multiple exhibits in the museum. You can spot colorful peacocks, ancient species of dogs (also found in Diego Rivera murals), and other artwork in the campus.

The museum hosts a large (possibly the largest) collection of Diego and Frida paintings and artwork. Walking around does not take long as it is a pretty small campus, but going through all the work of the two most famous painters of Mexico requires about 2-3 hours.

If you are only visiting Xochimilco, it makes sense to swing by and buy some affordable memorabilia from Diego and Frida’s land.

Location Tip
GPS Address – Av México 5843, La Noria, 16030 Ciudad de México, CDMX, Mexico
Parking is on the street next to the main door. There are limited amount of parking and can get crowded, but it is free.

Check out our Photo Gallery here

1 5 6 7 8 9